
Cart is empty
DIY Stocking Hanger

Category: Blogs
Posted: 11-13-2015 06:06 PM
Views: 13950
Synopsis: No mantle? No problem! You can make this super easy and festive stocking hanger!
Posted: 11-13-2015 06:06 PM
Views: 13950
Synopsis: No mantle? No problem! You can make this super easy and festive stocking hanger!
|
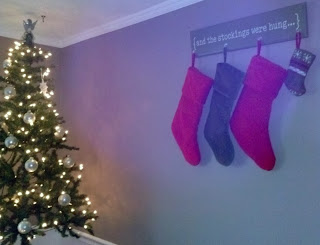
So, I've moved. A lot. Which means we are always living in a rental. When the holidays come around, decorating can be difficult. We certainly don't have a fireplace, and I don't want to start hammering things into the walls either. I had purchased some decals from Beautiful Wall Decals in the past, because they are perfect for those who rent (or change their mind a lot!). They don't damage the walls, and it's a much easier way to spruce up the place than by painting. I turned to them once again when I was looking for a cute and clever way to display our Christmas stockings. And, as always, they had exactly what I needed: This "and the stockings were hung.." decal. Once I got my decal in the mail (and some other cute Christmas ones that I couldn't resist), I got right to work on my stocking hanger!
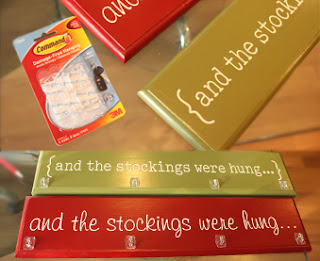
Here's what you need: This decal from BWD - It comes in two styles, so I bought both and made one for a friend, too! Wood sign - I purchased these nice pre-made ones at the craft store that were just the right size. You can also have them cut wood boards for you at Lowe's or Home Depot if you can't find the right size. Just be sure to sand them smooth! Paint and Paintbrush Laquer/Polyurethane - This is optional, but I wanted to seal mine so it stays nice year after year. You can use either the spray on or paint on type. Hooks - I used handy dandy Command Hooks for mine, but you can certainly use hardware if you like that look better. I chose removable hooks, because maybe my family might be growing soon! Command Strips - I definitely recommend these for hanging because they're so easy and remove without a trace when the holidays are over.
Step 1: Prep and paint your board. Do some sanding if it needs it, and then paint. Don't forget the sides! It may need a couple of coats, so just keep going until you have a nice even look.
Step 2: Let dry completely. Then apply your decal. Your order will come with detailed installation instructions and an installation tool, so it will be super simple! Lay out your hooks on the board before you apply your decal, to make sure you leave enough room for them at the bottom.
. Step 3 (Optional): Seal the entire board with polyurethane. As you can see, I tried both the spray and the paint on. I found the spray to be easier, but I liked the thicker finish of the paint.
Step 4: Apply your hooks. If you're using Command Hooks, like I did, you can trim off the easy release tab at the bottom.
Step 5: Hang with Command Strips, and enjoy!
I just love the way these turned out and my friend was so happy with her gift, as well. Anything that makes the holidays easier is certainly a good thing! |
Comments on DIY Stocking Hanger
-
 Best Selling Decals (66)
-
 Artistic Wall Decals (88)
-
 Words & Wall Quotes (74)
-
 Trending (33)
-
 Young at Heart (189)

I bought this for my living room and it looks great. I have it in black since I have a tan colored wall. I was looking for the right quote for our family, and this one spoke to me.
Jun 10, 2014
-
Life is Not Measured Wall Decal
 $24.99
 -
Family Where Life Begins Wall Decal
 $19.99
 -
Home is Where Love Resides Wall Decal
 $44.99
 -
Chanel Wall Decal
 $19.99
 -
Ornate Baroque Wall Decal
 $39.99
 -
Bubble Dot Circles Wall Decal Pack
 $31.99
 -
Blossom Tree Large Wall Decal
 $79.99
 -
Basketball Lines Wall Decal
 $34.99
 -
Color Sample Card
 $3.00
$3.00 -
Custom Wall Decal
 $10.00